There is absolutely no reason why kosher food and desserts have to be anything less than what everyone else is eating. Share with me your baking and cooking sucesses, challenges, and disasters. I will share my recipes, shabbat and holiday menu planning and my love of food.

Tuesday, December 11, 2012

The Chanukah Splurge


When you put a cookbook out into the world you hear from a lot of people you do not know. A new bride once wrote that my recipes reminded her of desserts made by her grandmothers, but that sadly they had passed away before she could write down their recipes. The Kosher Baker had helped her honor their memory. Others tell me that they are the best bakers in their communities, but that one of my recipes didn’t succeed. I always write back and ask questions to get to the bottom of the problem.  Often the culprits are extra large eggs when the recipe calls for large eggs, or that they took the liberty of making three changes to the recipe and were surprised that it didn’t work. 

One complaint I have taken seriously is from people who want to avoid parve margarine in their dairy-free desserts. As a parve baker, I often use margarine, not the healthiest ingredient. I cannot live without it to make fabulous piecrust, shortbread and pastry cream. Oil just isn’t always a perfect substitute. My grandma Sylvia lived until age 98 and she baked with trans-fat margarine. I cannot make everyone happy; no writer can.

I am writing to tell you that I hear you. My new book, The Holiday Kosher Baker (Sterling 2013), shows that I am moving in the healthier dessert direction. The new recipes use more whole grain flours, less sugar and less margarine.  I became so disgusted with the medicinal taste of sugar substitutes that I avoided them altogether.  

Notwithstanding this evolution, I stand by my mantra that a healthy diet can include desserts, especially homemade ones. Yes, if you eat the entire loaf of chocolate babka (I know who you are), then yes, that is consuming way too much margarine. But if you stick to one serving, and I repeat, one serving, then you will not become overweight on the basis of the babka alone. I have already shared on this blog my tactic of the Three S’s: sweat, salad and Spanx, which together allow me to taste the enormous quantity of desserts I produce without becoming a rotund pastry chef.   

Chanukah comes just once a year. This week I am eating my latkes followed by sopapillas (recipe below), delicious fried dough triangles topped with honey, sugar and cinnamon. I still plan to still fit into my gown for my twins’ bar mitzvah party in four weeks and I will even buy a new pair of Spanx for the occasion. 

Postscript: If you want a healthier dessert this Chanukah, go to my posting at www.kosherscoop.com for instructions on how to bake rather than fry doughnut holes and to see my recipe for cinnamon doughnut holes with a caramel dipping sauce.  

Sopapillas

Sopapillas are common in Central and South America and are pieces of dough that puff up when fried. I first tasted them slathered with honey and powdered sugar on a trip to Sedona, Arizona. Sopapillas are a nice change from doughnuts 
and as each piece is smaller than a typical doughnut, I feel that I am satisfying my fried dessert fix with a smaller portion. 

Serves 8
2 cups all-purpose flour, plus extra for dusting
1 teaspoon baking powder
½ teaspoon salt
2 tablespoons solid vegetable shortening
¾ cups soymilk or water
2-3 tablespoons confectioners’ sugar
3 tablespoons honey
¼ - ½ teaspoon cinnamon
canola oil for frying

Place the flour, baking powder and salt into a large bowl and mix with a dough hook for a few seconds. Add the shortening and soymilk or water. Mix until the dough comes together into a ball, scraping the dough off the hook a few times and turning it over, until the dough is smooth. Cover the bowl with plastic wrap and let the dough rest for 20 minutes. 

Heat 1½ inches of oil in a medium saucepan over medium-high heat and use a candy thermometer to see when the oil temperature hovers around 375°F. 

Sprinkle some flour on a large piece of parchment paper and use a rolling pin to roll out the dough until thin. You can cut the dough into any shapes you like. I cut 3-inch wide strips and then cut each strip into squares. I cut each square into two triangles. I used a fluted pastry wheel to add the pretty ridges to the edges of the triangles.

Place a wire rack over a large cookie sheet covered with aluminum foil. When the oil temperature is ready, fry six triangles at a time until golden, about 1¼ to 1½ minutes per side. Use a slotted spoon to lift up the sopapillas, allowing the excess oil to drip off, and place on the wire rack to cool. Make sure the oil temperature returns to 375°F before you add the next batch. Sometimes I have to lower the flame and wait a few minutes until the temperature cools to 375°F.

To serve, drizzle honey over the sopapillas and use a sieve to dust generously with the confectioners’ sugar. Sprinkle cinnamon on top and enjoy. Store covered at room temperature for up to two days. May be reheated.

Monday, June 25, 2012

Summer Freeze


I met my first ice cream machine last summer when I walked onto the set of Food Network’s dessert show, Sweet Genius.  Call me crazy, but yes, I made my first ever batch of homemade ice cream in front of millions of people.  Sadly, my rosemary ginger ice cream did not make it onto my plate and Judge Ron Ben-Israel never got to taste it.  I survived that round anyway and decided then and there that it was time to master ice cream. 

When you’re a pastry chef, you try to save some desserts for eating out.  It is disheartening to read a dessert menu and see a list of desserts you make on a regular basis.  Until last year I saved ice cream for eating out, and would treat myself only when I was at the beach, a restaurant that had an interesting flavor, in Europe or at Rondeau’s Dairy Bar in Palmer, Massachusetts, just up the road from Camp Ramah. Yet now that I make ice cream, I am running out of desserts to order when I am out.  Given how much sugar I have to eat in my line of work, perhaps that is not such a bad outcome. 

Last week at the Fancy Food Show in Washington, DC, among the multitude of razor thin crackers, flavored sodas, goat milk caramels and infinite tea companies there were many ice cream companies promoting all kinds of whacky ice cream flavors.   To date, the strangest frozen treat I have made is avocado sorbet, for which my kids still mock me.  Beer ice cream was also a dud because the beer flavor was completely obscured by the vanilla. 

At the food show, I found Chozen ice cream, which has flavors such as chocolate babka swirl (yummy) and ronne’s rugelach, and new dairy-free ones such as heavenly halvah and coffee talk.  Moorenko, a local company that produces ice cream minutes from my house, has flavors such as rice pudding and fresh ginger, and they expect to receive kosher certification later this year. 

I tasted Coconut Bliss's delicious ice cream which is entirely dairy-free and uses coconut milk rather than milk and cream.  That gave me an idea.  I have wanted to attempt parve ice cream for a while and was considering using parve whipping cream and soymilk.  Coconut milk is a healthier and tastier option.  You will not believe how creamy this ice cream is and you will swear that it is dairy.  It reminds me of eating coconut ice cream pops on the beach in Tel Aviv many years ago. 

I tried several ice cream-making methods before I bought the cookbook, Jeni's Splendid Ice Creams at Home.  Jeni’s method uses cream cheese, a little corn syrup and cornstarch to thicken her ice creams rather than eggs.  Her method does, however, require the use of two whisks, two silicone spatulas, at least three bowls and sometimes two saucepans.  The instructions are easy to follow and the result is spectacular and creamy ice cream with deep flavors.  The chocolate coconut ice cream below was a bit hard to scoop when I took it out of the freezer,  but after a few minutes it softened perfectly.  Happy Summer!

I use the Cuisinart ICE-50BC Supreme Ice Cream Maker.  They also make a duo machine that makes two flavors simultaneously and a new model that has a setting for gelato.

Chocolate Coconut Ice Cream
Makes one quart

Chocolate Mixture
½ cup unsweetened cocoa
½ cup water
½ cup sugar
2 ounces bittersweet chocolate

Coconut Ice Cream Base
3 cups coconut milk, the thick, white creamy kind
1 tablespoon cornstarch
3 tablespoons soy cream cheese
1/8 teaspoon salt
½ cup sugar
2 tablespoons corn syrup

Place the cocoa, water, and ½ cup sugar into a small saucepan. Bring to a boil over medium heat and whisk well.  Turn heat to medium low and cook for one minute, whisking often.  Remove from heat and add the chopped chocolate.  Let sit for 5 minutes.  Whisk well.

Place the cream cheese and salt into a medium bowl and use a silicone spatula to mix blend together.

In a small bowl, place the cornstarch.  Measure two tablespoons of coconut milk out of the three cups and add to the cornstarch.  Mix well and set aside.

Set up a large mixing bowl with about 3-4 cups ice cubes and 2-3 cups water.  Have a gallon freezer bag ready for the ice cream.

Place the coconut milk, sugar and corn syrup into a small saucepan and heat over medium high heat until boiling.  Turn heat down to medium low and cook for three minutes, whisking often.  Remove from heat and turn heat down to low.  Add the cornstarch mixture to the saucepan and stir.  Place back on the heat over medium low and cook for two minutes, until mixture thickens.

Remove from heat and add about ½ cup of the hot mixture to the chocolate mixture and whisk well.  Add another ½ cup and whisk in.  Pour in the remaining mixture and whisk well.  Pour into the gallon freezer bag, squeeze out the extra air, seal and let chill in the water bath for 30 minutes, adding more ice if it all melts.

Pour into the chilled container of your ice cream machine and spin and freeze until thick and creamy and the machine stops spinning. Chill for 3-4 hours.

Friday, May 11, 2012

How Does Nougat Glacé Symbolize Jewish Survival?


Last week, I accompanied my twins’ sixth grade class on a visit the U.S. Holocaust Memorial Museum.  While the students visited the Daniel’s Story exhibit, designed for young children, I went on a special tour for parents to the permanent exhibit where we discussed ways to discuss the Holocaust with our children.  Our guide suggested we talk to them about the rich Jewish communities of Europe that existed prior to the war, the slow rise of Nazism and why it was so popular, the lack of response of bystanders, and the resistance, and less about the more gruesome aspects of the Final Solution. She reminded us that for many of their questions, such as why more Jews didn’t run away or where God was, there are no simple answers. 

After our tour, we rejoined the children for a program where they were shown photos from the museum’s collection and asked to comment on them.  The first photo was of Italian girls dressed up for the holiday of Purim.  They were wearing long white skirts and white hats that looked like chef’s hats.  The object was to show the students that before the Holocaust, Jewish kids lived normal lives like they do today.  

When I have taken my own children on trips to Europe, we always visit Jewish institutions, such as synagogues and kosher restaurants.  There they see European Jewish children running around after services and eating pizza, a picture as normal as the Italian photo in the museum.  As they study more about the Holocaust, they will learn that between a thriving community pre World War II and today, many of the European Jewish communities were devastated.

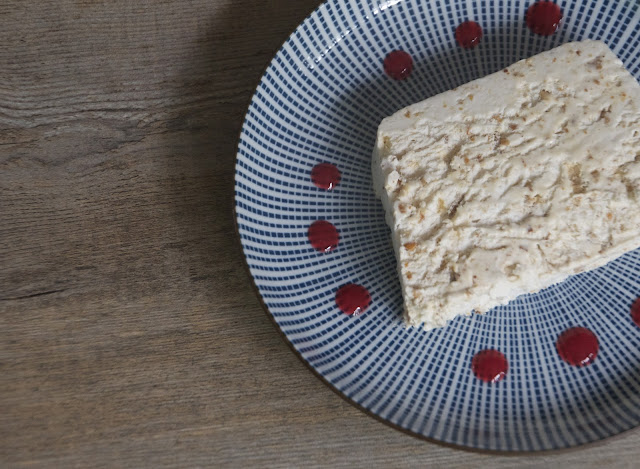
When my family lived in Geneva, Switzerland from 1993-1997, we traveled by car all over France.  As the Provence region was only three hours away, we visited multiple times, each time exploring a different area.  One of my favorite desserts from the region is called Nougat Glacé (pronounced noogah glacay), a light frozen candied almond dessert, creamy and crunchy at the same time and very refreshing. 

Last December while in Paris researching the kosher pastry shops of the city, I ate at several delicious kosher restaurants. One place, Le Chateaubriand, offered a very classic menu, so I started with ordered foie gras, had roasted veal, and finished with their nougat glacé, the traditional French dessert.  In Parisian kosher bakeries you will find both classic Ashkenazi and North African pastries.  Yet every kosher patisserie in Paris, and there are many, also offers the same traditional French desserts you see all over Paris and beyond: éclairs, fruit tarts, and croissants. I witnessed a thriving Jewish community that doesn’t retreat from French life; rather, it embraces it while retaining its own rich Jewish character. 

As American Jews we feel that we have always achieved this balance. We feel entirely American and deeply Jewish.  We were raised on apple pie and mandelbread.  We even turned bagels into American bread. Friends, you need to visit the  Holocaust Museum to fully appreciate how our European Jewish heritage was nearly completely destroyed and that we are profoundly blessed to be living Jewish in America.  And when you can, go to Paris, and sometime between the Louvre and the Eifel Tower, eat classic French desserts in kosher pastry shops or restaurants and smile a sweet, triumphant smile.  We are still here.

Nougat Glacé               gluten-free, dairy-free
Makes 16 servings

This dessert feeds a crowd, but the best part is that you can store it in the freezer for up to one week and slice and serve as desired.  I like to serve it with a berry sauce, but puréed mango or kiwi would also look pretty and taste good too.  I imagine that a chocolate sauce would make it taste like a candy bar, so let me know if you try that.  The recipe is made in two parts and you can make the praline even a week before you finish the dessert, but you will have a hard time NOT munching on it. 

Praline (caramelized almonds)
¾ cup sugar
3 tablespoons water
1 cup slivered almonds (long sticks, not sliced)

Mousse
½ cup sugar
¼ cup honey
½ cup water
3 large egg whites
2 cups non-dairy (parve) whipping cream

To make the praline, place the sugar and water in a heavy saucepan and cook over medium high heat until the mixture thickens and starts to color.  Add the nuts and stir with a wooden spoon.  Turn heat down to medium low.  The mixture will get dry, but then the sugar will melt again and turn golden.  Keep stirring.  The praline is done when the nuts are toasted, surrounded by a dark caramel and all the sugar pieces have melted.

Use a wooden spoon or silicone spatula to spread the nuts and caramel on a parchment-covered baking sheet, and let cool for at least 15 minutes.  Store in a bag or container for up to one week.  When ready to use, place the praline in the bowl of a food processor fitted with a metal blade and chop the nuts so that the largest pieces are about ¼ inch; some will have turned to powder, but just make sure there are many ¼-inch pieces which give the dessert the right crunch.  Set aside.

To make the mousse, line a 12-inch loaf pan with plastic wrap, making sure the wrap is sitting in the corners and goes all the way up the sides of the pan to the top.  Use two pieces if necessary.  Beat the cream until stiff.  Set aside.  

To make the Italian meringue, heat the sugar, honey and water in a heavy saucepan over medium high heat.  Place the egg whites in the bowl of a stand mixer fitted with a whisk.  When a candy thermometer placed into the honey/sugar mixture reads 225°F, start beating the whites on low speed and then increase the speed slowly to achieve soft peaks and then stop beating.  When the cooked mixture reaches 260°F,  turn the machine to low speed and add the sugar and honey mixture slowly down the side of the bowl.  Turn the speed up to high and beat for five full minutes, until the mixture is thick and shiny and the bowl is no longer hot to touch. 

Fold the chopped nuts into the meringue mixture.  Fold in the whipped cream in four parts and scoop into the prepared pan.  Smooth the top.  Lift the pan about an inch off the counter and drop down to remove any bubbles inside.  Cover with plastic wrap.  Place in the freezer for 8 hours or overnight.  To serve, remove top plastic and turn the loaf out and onto a long, rectangular plate.  Serve ½- 1-inch slices.  Store covered in the freezer and slice as needed.  Serve with a colorful fruit sauce.